Introduction
Do you have a Blogger blog and wish to use your own domain name? It can give your website a more professional appearance and make it simpler for people to remember the address. I recently updated my blog's domain during a rebranding process, and I’m here to guide you through the setup process.
What You'll Need
- An active Blogger account.
- A purchased domain name
- Admin rights to your blog and DNS provider.
I have purchased my last few domains with Namecheap and had good experiences. I now have an affiliate account with them. If you need to purchase a domain, you can find one here. And it is a great way to show your support.
Find a domain starting at $0.99
powered by Namecheap
Understanding DNS
Before we dive in, I want to discuss Domain Name Systems (DNS). Consider it like a phone book; you lookup a person's name to find their phone number. Similarly, a DNS translates human-friendly domain names (like tigertriangle.tech) into computer-friendly IP addresses (like 216.239.36.21).Blogger Configuration
Let's begin!
- Visit blogger.com and log into your account.
- Find the gear icon (Settings).
- Scroll to the "Publishing" section and find "Custom Domain."
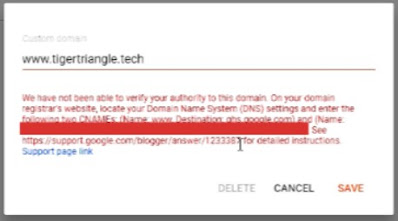
- Type in your domain name and expect an error message to appear. Don't close this message—we'll need the information shortly!
 |
| Important CNAME Information |
Understanding CNAMEs
Your error message will contain two CNAMEs. These are essentially aliases that point to other domain names:
- Standard CNAME: Common to all Blogger setups.
- Unique CNAME: Specific to your blog.
Updating Your DNS Records
Now we'll head to your domain registrar (where you purchased the domain). Below, I'll use Namecheap as an example; your registrar might have a slightly different interface.
- Find Your Domain: Locate the domain you want to use with Blogger.
- Depending on your registrar, look for "Advanced DNS" or similar.
- After making a note of existing records or backing up your DNS, remove any existing default records (like those used to park your domain).
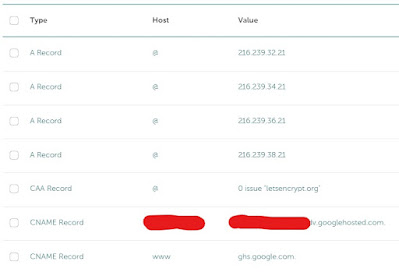
- Copy and paste the two CNAMEs from the Blogger message into your DNS.
- Blogger's help page provides four IP addresses for this. Create A-records to redirect tigertriangle.tech to www.tigertriangle.tech.
- 216.239.32.21
- 216.239.34.21
- 216.239.36.21
- 216.239.38.21
- Add a CAA record for "Let's Encrypt." This allows Blogger to issue a free SSL certificate for your website.
 |
| Example of DNS Entries |
Finalizing in Blogger
- Return to Blogger's custom domain settings. It should now work successfully.
- If not, refer to Blogger's help page for troubleshooting tips.
- Remember to enable HTTPS availability and HTTPS redirect in Blogger.
Important Note: DNS changes can take some time to propagate across the internet. Be patient; it might not happen immediately.
Recap
Here's a quick summary:- Blogger account setup & domain purchase.
- Access Blogger settings -> Custom Domain.
- Add records (CNAMEs, A-records, CAA) to your DNS.
- Finalize the domain setup in Blogger.
Happy blogging!
